How To Draw A Seal

I am going to show you How To Draw A Seal – A Sea Lion, in a few easy steps. Many people think they know how to draw a sea lion because its body has a seemingly simple shape.
The problem with the drawing may occur when balancing the body proportions, the flippers, and the head.
If you observe well any photo with a sea lion, you’ll notice that his snout very much resembles that one of a dog.
I like seals because they are intelligent animals, but I am sure many people do not consider them so cute and friendly because some aggressive male sea lions used to (rarely) attack humans too.
But let’s just stay with the cute image of the seal.
The following drawing steps are simple as always, and I am sure you are going to love them!
Using these easy-to-follow drawing techniques, you can virtually draw any animal you chose.
The key is to practice and practice and practice and if you are dead tired then practice the next day, that’s it.
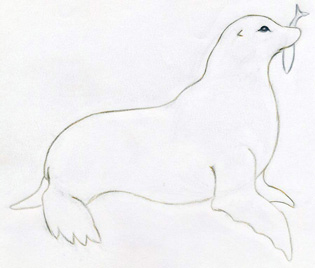
To show you how to draw a seal in the simplest possible way, I have chosen this relaxing pose with a fish. This is maybe the most common pose of a seal.
Let's Learn How To Draw A Seal
OK, so let’s begin. First, observe well the body posture. Do not look at the color now. Just observe the posture, where his snout is pointed, his fore-flippers, and the position of the eyes, ears.
This sea lion seems to be quite satisfied with a fish so his posture is quiet and relaxing.
The important point is to notice the white small shining spot in the eyes. I always stress this again and again, because this little shiny dot in the eyes gives the whole drawing a realistic impression.
Draw three uneven ellipses as you see in this picture. Draw as many pencil strokes as necessary. Enlarge the picture to see the details.
The position of these ellipses will determine the main three parts of the seal’s body and their position.
This technique is very easy and simple to use when you learn how to draw a seal or any other object of drawing.
Before you join the ellipses together with gently curved pencil lines, please draw one smaller ellipse – that will be the seal’s snout. Now, join the ellipses the same way as you see in the picture.
Outline the hind-flippers and the upper part of the fore flippers.
Outline the eyes - very gently, just mark out the spot where the eyes will be placed.
Outline the rest of both fore-flippers and hind-flippers.
Small ears are positioned behind the eyes. Enlarge the picture to see it more clearly, and then draw it. Push the pencil very gently. Remember, we are still doing a kind of sketching work here.
Cool, your seal is getting its final shape. From this step on it’s getting easier and easier. You are almost at the stage where you can teach your friends how to draw a seal.
You can outline the contours of the entire body. I used a 6B soft pencil. If you do not have any softer pencils handy, it is OK, just do it with a standard HB pencil.
Draw the contours of the fingers on each flipper, something similar as you see in the picture.
You can start erasing all unnecessary pencil lines. Observe the picture well. Leave only the outer contours as you see in the picture.
Gently erase all initial pencil strokes. You may want to use a pencil-type-eraser.
Finally, make a rough sketch of a fish in a seal’s mouth. We can finish it later.
Now, let’s refine the whole body contour lines, the fish in his mouth, and the most important part – the eyes.
Draw a more distinct pencil contour of the body but gently. Outline the silhouette of the fish and darken the eyes. Leave a small tiny white dot in the eyes.
Now you have ready a perfect coloring page of a seal. At this stage, your seal drawing is virtually ready. You have already learned how to draw a seal. You can stop here, darken the body only with graphite pencil, and you are done.
But if you want to color it, then let’s continue further.
By light brown color pencil outline the whole body contour. Draw the brown color over the graphite contour lines. When done, take the eraser and slightly erase the remaining graphite pencil strokes.
After erasing the graphite pencil lines, only the brown color pencil contour remains. You need not touch the eyes now, not yet.
Using the same or similar light brown pencil, color the whole body of the seal as you see in the picture. You can also color the fish with a grey pencil or graphite pencil.
Leave the snout part white we shall color it later.
Now take a darker tone of brown pencil and cover again the whole body as you see in the picture. Snout still remains untouched.
You see the whole process of how to draw a seal is not so difficult, because so far it contained mainly contours. The second part – the coloring is often more time-consuming and a little bit complex than the drawing itself.
Seals have very short and thick fur; many of them have dark brown or dark grey colors. Bottoms and flippers are often almost black.
Take a black color pencil and begin to darken the lower part of the body as you see in the picture. Use a black color pencil, don’t color it with a graphite pencil.
You’ll see that this coloring exercise will help you refine the whole process of how to draw a seal.
Always do your best and do it much better than I did. That is the purpose of your learning.
Using a black color pencil, continue to darken the body upwards, as you see in the picture.
Leaving some parts on the body brighter gives your drawing a realistic impression.
The final step is to darken the snout, draw the sensory whiskers, and color the fish. Enlarge the picture to see all the details.
Did You Enjoy Drawing a Seal?
Check Out Also These Animal Drawing Tutorials:
Visitors Personal Gallery Pages
Please see and enjoy the following collection of personal galleries. We all believe you will have a lot of fun. Observing others’ artwork is always, always very inspirational. You may get some new ideas for your own drawings.
|
| |||
Theme Based Visitors Galleries
The following Theme Based Galleries are a collection of selected drawings from various authors based on a certain theme. I would like you to get as much inspiration as possible for your own drawings.
And Now It's Your Turn
SHARE YOUR DRAWINGS
Select The Category and Follow The Uploading Instructions
Share your own drawings, sketches or doodles by choosing a suitable
category below. You will be guided to the uploading process step by
step.
Latest Visitor's Drawings
-
Loneliness
Jul 20, 24 08:03 PM
Loneliness -
A macho man kills a poisonous snake
Jul 18, 24 09:15 AM
A macho man kills a poisonous snake. -
Jude Bellingham
Jul 15, 24 09:01 AM
This is my method of drawing an Englishman Jude Bellingham on Microsoft Paint. He was born in Stourbridge, West Midlands, England, United Kingdom on 29th -
Fatty people are stupid fellows
Jul 14, 24 08:46 AM
Fatty people are stupid fellows. -
Face the present time
Jul 14, 24 08:45 AM
Face the present time. -
cricket
Jul 02, 24 04:26 PM
cricket -
Three Generations: Grandfather, Father and Son
Jun 26, 24 05:52 PM
Three Generations: Grandfather, Father and Son -
The Shapers heads
Jun 26, 24 07:23 AM
This is my drawing of the Shapers heads for the fake Nickelodeon animated series of the same name on Microsoft Paint. In order, they're Purple Square, -
Where nature dominates
Jun 24, 24 09:26 AM
Imaginary ballpoint pens art. In this fast and furious world dominated with pollution and skycrapers, we need this type of peacable place for anti-stress -
Never argue with the barking dogs
Jun 24, 24 09:23 AM
Never argue with the barking dogs. -
Imaginary pen art on bristol paper
Jun 22, 24 07:28 AM
Colourful nature done with ballpoint pens. -
Imaginary pen art, beautiful nature
Jun 22, 24 07:22 AM
Ballpoint pens art showing a peaceful place. The grass was made with light green pen and application of lemon yellow watercolour. -
Old building in forest
Jun 22, 24 07:20 AM
Imaginary ballpoint pens art. An old building in a forest. -
Typical Mauritius
Jun 22, 24 07:19 AM
Imaginary ballpoint pens art showing typical Mauritius. -
Inspired by Mumbai city
Jun 22, 24 07:16 AM
Some years back was watching a video about Mumbai city. Inspired by it, I decided to make an imaginary art showing the atmosphere of it.


