Butterfly Drawings in Pencil

What butterfly drawings in pencil really are about? At first sight, they may look like only a pair of opened wings and I think that might be the point. The wings.
When you learn the basic patterns of butterfly wings, you can say you’ve learned how to draw a butterfly. That’s it and that is all you need to know.
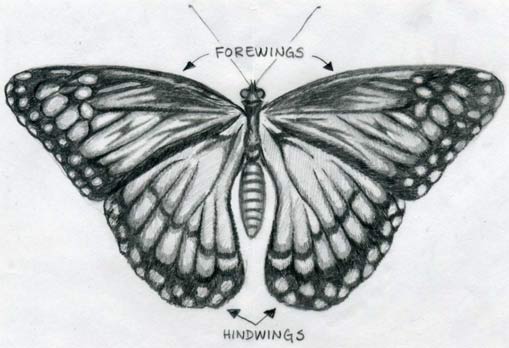
Basically, every butterfly has 2 fore wings and 2 hind wings, which structure resembles a stained-glass pattern. Once you’ve mastered the proportion balance between fore wings and hind wings, you can draw your own fantasy butterflies.
Many butterfly symbols, illustrations, etc are created this way. A silhouette of these artworks often has nothing in common with real butterflies at all, yet they are still beautiful.
Butterfly Drawings in Pencil
The patterns, which look like a frame, are in fact the veins that nourish the butterfly’s wings. Did you know that recent studies find that hind wings help make butterflies (and moths) quick turns during the flight to escape or evade predators? It is fantastic how Mother Nature takes detailed care of these beautiful colored creatures.
If you catch butterflies, please take special care of their wings! They are too fragile and once they are broken, they cannot repair themselves and the butterfly will be unable to survive. So, when you first attempt to make butterfly drawings in pencil, please do not worry about the exactness so much.
I cannot help but repeat this almost on every page, that you are a human, not a camera. Be easy about it. You can never make a drawing perfect ;-) The easiest way is to draw one with opened wings, so that you can clearly see the size, the pattern and it is easy to copy.
OK, so let’s draw the butterfly on the larger image on top of this page. Click on the image to open it in a new tab or window and then observe the details of the pencil strokes. Ignore the wings description this time.
The drawing may appear to be pretty detailed if you look at it on the smaller image, but if you zoom it up, you will see that I did not care too much about the delicacy of the pencil strokes.
Click on the images and they will enlarge in a new tab or window. Print it out and simply copy it. If you cannot copy it, then get yourself a tracing paper and simply trace it on the tracing paper.
Outline first the basic shape of the wings, the outer line, and the “mosaic” on the wings. That will give you a basic idea of where you will follow up with detailed pencil work.
Keep your drawing rather rough (not exact) because you can later get some creative ideas of your own. It really works that way!
When you are ready with the basic wing frame you can start to create the pattern. Begin to shade from those parts that are the darkest.
I started from the upper half on the left fore-wing. Click on the image so that you can see better in detail how I shade each part on the wings.
You will easily notice that even on these simple butterfly pencil drawings, I used only three shade tones. Basically, that is sufficient to complete a simple drawing.
When you have ready the left half of the butterfly drawing, I would recommend you fold the paper in the middle of the butterfly body – along the body and flip the ready wing on the opposite side.
Then press the paper by your nails and “embed” the graphite pattern on the right side so that you will get a “print” of the left-wing on the right side. This ensures that both sides – both wings will be equal, as you see in the image above.
Then you simply “fill up” the right-wing by pencil and voila (!), you’re done. It is pretty much like a kind of coloring page. The difference is that you use only a pencil.
Did You Enjoy Butterfly Drawings?
Check Out Also These Animal Drawing Tutorials:
Visitors Personal Gallery Pages
Please see and enjoy the following collection of personal galleries. We all believe you will have a lot of fun. Observing others’ artwork is always, always very inspirational. You may get some new ideas for your own drawings.
|
| |||
Theme Based Visitors Galleries
The following Theme Based Galleries are a collection of selected drawings from various authors based on a certain theme. I would like you to get as much inspiration as possible for your own drawings.
And Now It's Your Turn
SHARE YOUR DRAWINGS
Select The Category and Follow The Uploading Instructions
Share your own drawings, sketches or doodles by choosing a suitable
category below. You will be guided to the uploading process step by
step.
Latest Visitor's Drawings
-
Loneliness
Jul 20, 24 08:03 PM
Loneliness -
A macho man kills a poisonous snake
Jul 18, 24 09:15 AM
A macho man kills a poisonous snake. -
Jude Bellingham
Jul 15, 24 09:01 AM
This is my method of drawing an Englishman Jude Bellingham on Microsoft Paint. He was born in Stourbridge, West Midlands, England, United Kingdom on 29th -
Fatty people are stupid fellows
Jul 14, 24 08:46 AM
Fatty people are stupid fellows. -
Face the present time
Jul 14, 24 08:45 AM
Face the present time. -
cricket
Jul 02, 24 04:26 PM
cricket -
Three Generations: Grandfather, Father and Son
Jun 26, 24 05:52 PM
Three Generations: Grandfather, Father and Son -
The Shapers heads
Jun 26, 24 07:23 AM
This is my drawing of the Shapers heads for the fake Nickelodeon animated series of the same name on Microsoft Paint. In order, they're Purple Square, -
Where nature dominates
Jun 24, 24 09:26 AM
Imaginary ballpoint pens art. In this fast and furious world dominated with pollution and skycrapers, we need this type of peacable place for anti-stress -
Never argue with the barking dogs
Jun 24, 24 09:23 AM
Never argue with the barking dogs. -
Imaginary pen art on bristol paper
Jun 22, 24 07:28 AM
Colourful nature done with ballpoint pens. -
Imaginary pen art, beautiful nature
Jun 22, 24 07:22 AM
Ballpoint pens art showing a peaceful place. The grass was made with light green pen and application of lemon yellow watercolour. -
Old building in forest
Jun 22, 24 07:20 AM
Imaginary ballpoint pens art. An old building in a forest. -
Typical Mauritius
Jun 22, 24 07:19 AM
Imaginary ballpoint pens art showing typical Mauritius. -
Inspired by Mumbai city
Jun 22, 24 07:16 AM
Some years back was watching a video about Mumbai city. Inspired by it, I decided to make an imaginary art showing the atmosphere of it.
