How To Draw A Rabbit

Let’s draw a rabbit. I thought it would be helpful for you if I make some of the instructional material with a grid.
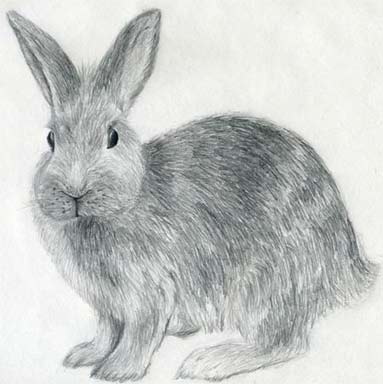
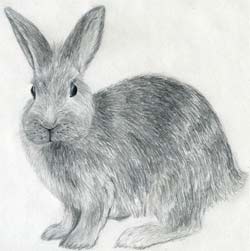
If you observe well the picture, you’ll notice that the drawing was made by simple, almost monotonous pencil strokes imitating the animal’s fur.
It is sometimes a boring job, I know, but the final effect should satisfy you.
I would like you to notice the slight differences in the fur’s tones and shades, i.e., lighter and darker parts.
Drawing animal fur by pencil strokes is sometimes very deceptive because when you make the first strokes you may feel that you’ve just done it totally wrong.
How to Draw a Rabbit
It only looks like that because it is unfinished. If that’s the case, please continue to draw and use the eraser as little as possible.
You’ll need two pencils:
HB pencil to enhance the darker parts and H pencil to create thin pencil strokes that look like fur.
Use the HB pencil.
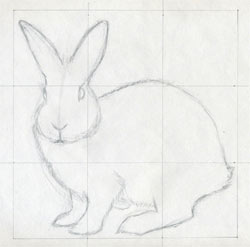
You can make a simple 3 x 3 grid of the same size squares if you like. The grid will help you draw much quicker and capture the outline contours more exactly.
Sketch the outline contours into the grid. Notice the points where the contours intersect the grid lines. Those points are your guides.
Refine the body contour and outline the facial features; eyes and nose. At this stage, your rabbit is almost a perfectly shaped sketch.
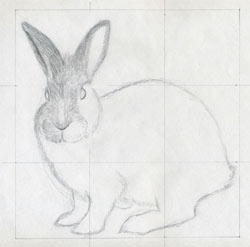
Erase unnecessary initial pencil strokes. Take your H pencil and begin to draw the fur on the rabbit’s head and ears.
If you are not sure, please test the fur drawing (pencil strokes) on a separate paper.
Gradually erase only those parts of grid lines that directly interfere with the areas you are working on.
Continue the H pencil strokes. Push the pencil gently. If you are not sure, make the strokes very light so you can have control over your drawing.
Do not worry about shading at this stage. To draw a rabbit, or I should say to draw a rabbit’s fur takes a little more time than usual.
Be patient.
Enlarge the pictures and observe how I developed the strokes (fur). I am sure you can make them much, much better and nicer.
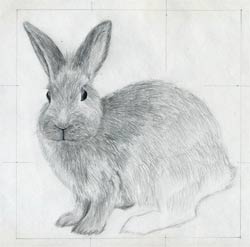
Similarly, continue the “fur-pencil-strokes” as you see in the pictures.
Notice how the rabbit’s body is round, nicely curved back-line. The fur strokes should be made in similar directions.
So, naturally, the fur strokes directly determine the shape of the body and its parts.
Work out the eyes and the area around the nose.
To draw a rabbit as perfectly as possible, you need to work out the animal’s face in as many details as possible.
Take your time and just continue stroking the fur all over the rabbit.
The fur on the head, ears, or legs is shorter than the fur on the back or on the sides.
To give more value to the facial features, take the HB pencil and darken the necessary parts around the nose and the eyes and those parts where you feel necessary.
Always erase the grid lines on the parts you are working on.
If you forget to erase them, the grid-lines will remain visible under the fur and you’ll have to erase it anyway. That may disturb your work.
Refine the furs strokes on the legs and you can begin to shade the body parts.
If you have your own rabbit pet, you can draw a rabbit directly live in your room or backyard.
One of the best ways to exercise would be to take a picture, print it out, and draw it.
Did You Enjoy Drawing a Rabbit?
Check Out Also These Animal Drawing Tutorials:
Visitors Personal Gallery Pages
Please see and enjoy the following collection of personal galleries. We all believe you will have a lot of fun. Observing others’ artwork is always, always very inspirational. You may get some new ideas for your own drawings.
|
| |||
Theme Based Visitors Galleries
The following Theme Based Galleries are a collection of selected drawings from various authors based on a certain theme. I would like you to get as much inspiration as possible for your own drawings.
And Now It's Your Turn
SHARE YOUR DRAWINGS
Select The Category and Follow The Uploading Instructions
Share your own drawings, sketches or doodles by choosing a suitable
category below. You will be guided to the uploading process step by
step.
Latest Visitor's Drawings
-
Loneliness
Jul 20, 24 08:03 PM
Loneliness -
A macho man kills a poisonous snake
Jul 18, 24 09:15 AM
A macho man kills a poisonous snake. -
Jude Bellingham
Jul 15, 24 09:01 AM
This is my method of drawing an Englishman Jude Bellingham on Microsoft Paint. He was born in Stourbridge, West Midlands, England, United Kingdom on 29th -
Fatty people are stupid fellows
Jul 14, 24 08:46 AM
Fatty people are stupid fellows. -
Face the present time
Jul 14, 24 08:45 AM
Face the present time. -
cricket
Jul 02, 24 04:26 PM
cricket -
Three Generations: Grandfather, Father and Son
Jun 26, 24 05:52 PM
Three Generations: Grandfather, Father and Son -
The Shapers heads
Jun 26, 24 07:23 AM
This is my drawing of the Shapers heads for the fake Nickelodeon animated series of the same name on Microsoft Paint. In order, they're Purple Square, -
Where nature dominates
Jun 24, 24 09:26 AM
Imaginary ballpoint pens art. In this fast and furious world dominated with pollution and skycrapers, we need this type of peacable place for anti-stress -
Never argue with the barking dogs
Jun 24, 24 09:23 AM
Never argue with the barking dogs. -
Imaginary pen art on bristol paper
Jun 22, 24 07:28 AM
Colourful nature done with ballpoint pens. -
Imaginary pen art, beautiful nature
Jun 22, 24 07:22 AM
Ballpoint pens art showing a peaceful place. The grass was made with light green pen and application of lemon yellow watercolour. -
Old building in forest
Jun 22, 24 07:20 AM
Imaginary ballpoint pens art. An old building in a forest. -
Typical Mauritius
Jun 22, 24 07:19 AM
Imaginary ballpoint pens art showing typical Mauritius. -
Inspired by Mumbai city
Jun 22, 24 07:16 AM
Some years back was watching a video about Mumbai city. Inspired by it, I decided to make an imaginary art showing the atmosphere of it.
